
Materials Needed
Essential Supplies
-
- Cylinder beads (also called tube beads) - 50-100 pieces, depending on size
- Elastic cord or beading wire (0.5-1mm thickness)
- Spacer Beads
- Scissors or wire cutters
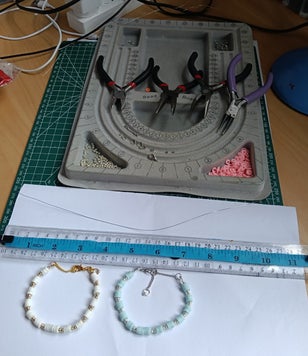
- Ruler or measuring tape
- Bead tray or small bowl
- Needle-nose pliers (if using wire)
- Crimp beads (if using beading wire)
- Jump rings
- Lobster clasp
Planning Your Design
Step 1: Measure Your Wrist
- Wrap a measuring tape around your wrist
- Add 0.5-1 inch for comfort
- Standard bracelet lengths: 6.5-8 inches
Step 2: Choose Your Pattern
Simple Options:
- All the same colour cylinder beads
- Alternating two colours
- Random colour mix
- Gradient effect (light to dark)


Spacer Bead Method
- Add small round beads between cylinder beads
- Creates texture and visual interest
- Use contrasting or matching colours
Advanced Patterns:
- Geometric designs
- Word or initial patterns
- Striped sections
Basic Cylinder Bead Bracelet
Step 3: Prepare Your Wire or Cord
- I cut my wire 30cm (approximately 12 inches). I like to have extra wire to finish the bracelet. (You don’t need this much, 23 cm/9 inches is enough.)
- Cut the elastic cord 4-6 inches longer than your bracelet length
- Tie a small knot at one end to prevent beads from sliding off
Step 3: String the Beads
- Thread the first bead onto your wire (1 spacer)
- Push it down to the Crimped end
- Add Six Cylinder Beads
- Finish with two Spacer beads
- Add Six Cylinder Beads
- Finish with two Spacer beads
- Continue adding beads until you have 6 sets of cylinder beads
- For the center of the bracelet, add twelve cylinder beads
- Then add two spacer beads
- Start again from step 3
- Add Six Cylinder Beads
- Finish with two Spacer beads
- Add Six Cylinder Beads
- Finish with two Spacer beads
- Continue adding beads until you have 6 sets of cylinder beads
.


Step 4: Finish the Bracelet
For Elastic Cord:
- Remove the temporary knot
- Tie both ends together with a secure double knot
- Trim the excess cord close to the knot
- Add a drop of super glue to the knot for security
- Hide the knot inside a bead
For Beading Wire:
- Thread both ends through a crimp bead
- Make a small loop and thread back through the crimp
- Use pliers to flatten the crimp bead
- Trim excess wire
- Add a lobster clasp and an O-ring on one end
- On the other end, add an o-ring and a chain.
- Finish the Chain With a bead and an o-ring
- Add an extra o-ring in the middle of the chain so it can be adjusted to fit the wrist.
Advanced Techniques
Multi-Strand Design
- Create 2-3 separate strands
- Make each slightly different lengths
- Connect all strands to a single clasp
- Creates a layered, dimensional look
Pattern Planning
- Sketch your design on paper first
- Use graph paper for complex patterns
- Color code your design for easy reference
Design Ideas
Color Combinations
- Monochromatic: Different shades of the same color
- Complementary: Colors opposite on the color wheel
- Analogous: Colors next to each other on the color wheel
- Neutral: Blacks, whites, grays, and browns
Pattern Suggestions
- Ombre effect: Gradual color transition
- Stripes: Alternating bands of color
- Random: Mixed colors for a bohemian look
- Geometric: Repeating shapes or patterns
Your finished cylinder bead bracelet will be a beautiful, personalized piece of Jewelry that reflects your style and creativity. Check out the video.