

Leather Weaving: A Step-by-Step Guide to Creating Beautiful Accessories
Introduction
Welcome to the HWL Blog! Today, we’re diving into the art of leather weaving—a timeless technique that adds texture and elegance to your jewellery and accessories. Whether you’re looking to create a stunning bracelet, a unique keychain, or a stylish bag, leather weaving is a versatile skill that can elevate your designs. In this tutorial, I’ll guide you through the process step-by-step, ensuring you have all the tools and knowledge you need to create your own beautiful leather woven piece.
Materials Needed
- Leather strips (choose your preferred colour and thickness)
- Scissors
- Ruler
- Cutting mat
- Jump rings
- Lobster Clasp
- Crimp ends 22 cm
- Craft knife (optional)
- Needle and thread (if sewing)
- Clips or clamps (to hold the leather in place)
- Optional: beads or charms for embellishment

Step-by-Step Guide
Step 1: Prepare Your Leather Strips
- Cut your leather into strips of equal width (I use 8 strands of leather for this design). A good starting size is about 25 cm wide (I use 26-27cm, so I can have room to finish nicely), but you can adjust based on your design. The finished length for this piece will be 18cm.
- Decide on the length of your strips based on the size of the piece you want to create.
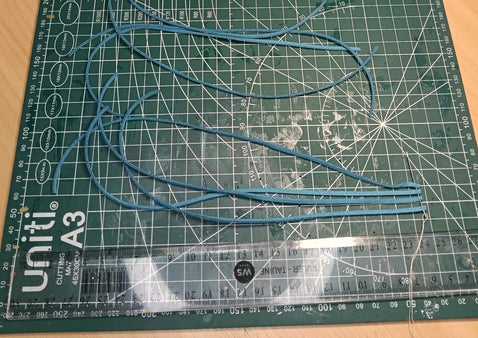


Step 2: Create the Base
- Take the strips and lay them parallel to each other (I like to stitch them together loosely with a needle and thread), leaving some space between them. This will be the base for your weaving.
- I add the crimp end now, as well as the jump ring and lobster clasp, so that I can attach it to something solid.
Step 3: Start Weaving
- Take a third strip from the right and weave it over to the left.
- Take the fifth strip from the right and weave it over the Sixth strip to the left, must have four strips pulled to the right and left.
- Next, weave the first strip over, under, over, and under to the left. You will now have five strands on the left side.
- Now we grab the eighth strip, Weave it under, over, under, and over to the right-middle. You should now have four stands on either side.
- Now we grab the eighth strip, Weave it under, over, under, and over to the right-middle. You should now have four stands on either side.
- Continue this pattern, alternating the over-under technique with each new strip you add.


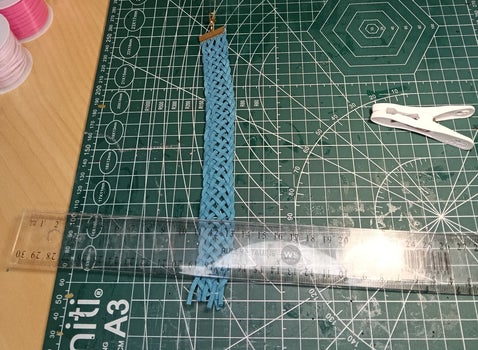
Step 4: Secure Your Weave
- Once you’ve reached your desired length, secure the ends of your leather strips. You can either tie them off, sew them, or use glue for a clean finish.
Step 5: Add Embellishments (Optional)
- If you want to personalize your piece, consider adding beads or charms to your woven design. This is a great way to make your creation truly unique!
Step 6: Final Touches
- Trim any excess leather, add Crimp ends to ensure all ends are secured, and finish with a jump ring. You can also condition your leather with a leather conditioner to keep it supple and enhance its appearance.


- I have added a video with multi-colour strands to use as a reference. Check out this video
Conclusion
From modest beginnings, we've grown through unwavering dedication and a commitment to continuous improvement. Each step has reinforced our core belief in the power of collaboration and the importance of integrity. We're passionate about what we do, and we're excited to share our story with you.
Add comment
Comments